SW-Motech Pro Side Carriers & Sysbag 30 Side Bags on a 2018 Suzuki DL1000A V-Strom

I just installed a set of Pro Side Carriers and these Sysbag 30’s on my 2018 V-Strom DL1000A. I give the whole setup a solid 4 stars. Why not 5 stars???

  1. Regarding the quarter-turn, quick release fasteners that hold the carriers to the motorcycle. The fasteners take a good amount of force to turn (that’s a good thing) but there’s one on each side has one that is behind the saddlebag frame and you cannot get to it with a screwdriver or any other implement in my copious tool box. I finally grabbed it from the side with a pair of vice grips and was able to twist and lock it. Scratching a brand new part to get it installed really bugs me.
  2. I don’t love the “buckles” that hold the bags closed. They’re just little hooks that slip into the loop on the lid. They don’t seem to have much ambition to stay closed, but at the same time they can be really stubborn when you’re trying to un-hook them to open the bags. I don’t understand why they didn’t just use fastex-style buckles.
    Those two nits are the reason that I only gave the bags and mounts 4 stars.

So why soft bags instead of the uber-popular aluminum panniers?
Firstly, weight. A set of Givi aluminum bags and mounts weighs about 35lbs EMPTY. These SW-Motech bags and mounts total about 19 lbs.
Second, cost. Hard panniers cost $700 to $1200 or more (not including the mounts.) These soft bags retail for about $800 INCLUDING the Pro Side Carriers.
Third, if you drop your bike on a hard pannier, you’re going to damage the bag. Sometimes badly enough to render it un-usable. Soft bags usually survive much better, and they also provide some cushioning for the motorcycle. Depending on how much poofy stuff is in them (rain suit, dirty laundry etc) it can be like having a side airbag to land on. (Just don’t pack your heirloom china in the side bags.)

So how did the installation go?
The mounts went on quickly and easily. I find that the part that takes the longest is sorting out the hardware and matching all the parts to SW Motech’s instructions. After that, everything fit perfectly. I like the way the right carrier tucks in relatively close to the bike. When the bags are off, the bike is as slender as it was stock.
Same for assembling the adapters to the bags. The instructions only show the right side mount and bag adapter; I admit to getting totally confused on the left bag adapter and having to do the whole thing twice. Once everything was finished, the bags literally go on and off the carriers with one click. (Seems too good to be true, so I have looped a safety strap over the seat, between the carry handles on the two bags. I have lost apparently secure luggage before…) Of course I must have some hidden hillbilly genes as I tend to come up with the ugliest possible solution to an issue that probably doesn’t exist. Bikes Built Better would never do something like that to a customer’s motorcycle!
I have not yet ridden in the rain so I can’t vouch for the waterproof-ness of the bags, but after a few hundred miles the carriers are solid and the bags have not shown any inclination to leave or open up on the road. I now have some very generous storage that doesn’t weigh half-a-ton, and will even help cushion the bike if I fall down. I just won’t be carrying the family heirloom china in the side bags.

Right side view SW-Motech Sysbag 30 on 2018 V-Strom DL1000A
Soft bags can act as cushions if the bike falls over.
SW-Motech Pro Side Carrier, right side.
One of the quarter-turn fasteners has an awkward location
Posted in Motorcycle News | Comments Off on

Harley Davidson Key Fob Pin Code Help

STARTING YOUR HARLEY DAVIDSON WITHOUT YOUR KEY FOB

  1. Turn the key to IGNITION. Immediately press and hold both turn signal switches until FIVE dashes appear in the odometer gauge. You now have 12 seconds to enter the first number:
  2. Select the first digit of your PIN (a) by pressing the left turn signal button (a) times.
    When the correct number appears in the first position on the odometer…
  3. Press the right turn signal switch one time to move to the next digit.
  4. Select the second digit of your PIN (b) by pressing the left turn signal switch (b) times.
  5. Click the right turn signal button one time to move to the next digit.
  6. Select the third digit of your PIN (c) by pressing the left turn signal switch (c) times.
  7. Press the right turn signal switch one time to move to the next digit.
  8. Select the fourth digit of your PIN (d) by pressing the left turn signal switch (d) times.
  9. Press the right turn signal switch one time to move to the next PIN digit.
  10. Select the fifth digit of your PIN (e) by pressing the left turn signal switch (e) times.
  11. Press the right turn signal switch one time to advance to the next digit.
  12. Press the right turn signal switch once. The security system alarm is now off.

If You Do Not Have Your Pin

Before something happens to your Fob on the road, either find your PIN code and save it someplace safe, or, with the working Fob present, assign a new PIN Code you will remember to the bike. Use the instructions below. If you have your Fob but the bike won’t disarm with it present, you may need to replace the CR2032 Battery inside the Fob. These are available at most stores. If you are reading this because you lost or damaged your Fob and did not assign a PIN Number, some dealers use a default PIN Number such as 12345 or the last 5 of the VIN. If that’s not the case and you don’t know the PIN, you’re screwed.

Setting Your Harley Davidson Alarm Override PIN

  1. Choose a five digit code (with each digit being 1-9) Keep this somewhere safe!
  2. With your assigned Fob present, turn ignition key ON – OFF – ON – OFF – ON
  3. Press left turn signal switch two times
  4. Press right turn signal switch one time, then release.
    * Both turn signals will flash three times. The current PIN will appear on the odometer screen. The first digit should be blinking.
  5. Select the first digit (a) of the NEW PIN by pressing the left turn signal switch (a) times
  6. Press the right turn signal switch one time and release. The new digit (a) will replace the current number in the odometer window, and you will advance to the next digit.
  7. Select the second digit (b) of your NEW PIN by pressing the left turn signal switch (b) times.
  8. Press right turn signal switch one time and release. The new digit (b) will replace the current in the odometer window, and you will advance to the next digit.
  9. Select the third digit of your PIN (c) by pressing the left turn signal switch (c) times.
  10. Press the right turn signal switch one time and release. The new digit (c) will replace the current number in the odometer window, and you will advance to the next digit.
  11. Select the fourth digit of your PIN (d) by pressing the left turn signal switch (d) times.
  12. Press the right turn signal switch one time and release. The new digit (d) will replace the current number in the odometer window, and you will advance to the next digit.
  13. Select the fifth digit of your PIN (e) by pressing the left turn signal switch (e) times. The new digit (e) will appear on the odometer screen.
  14. Press the right turn signal switch one time to move to the next digit.
  15. Press the right turn signal switch one more time to turn off the security system alarm. The odometer will return to mileage display
    *Turn OFF the ignition. Your NEW PIN is set.
Posted in Motorcycle Tech Tips | Comments Off on Harley Davidson Key Fob Pin Code Help

Motorcycle Clutch and Brake Levers for Small Riders Kuryakyn Boss Blades

Harley-Davidson has been building motorcycles for smaller riders. They also have “Reach” seats, handlebars, and even less-forward foot controls. But what about the all-important clutch and brake levers, the most nerve-wracking point of interface for smaller riders? Harley’s got nothing. Nada.
So we decided to try a set of Kuryakyn Boss Blades on a 2012 Softail Slim whose owner is a petite lady.
We discovered the following:
Once installed, the Boss Blades seem to be only 1/8″ closer to the grips. But they have a nice curved shape that allows the rider to wrap their fingers farther around the levers,
giving a rider with small hands a much firmer grip and better control over critical functions like clutch release.
Combine the Kuryakyn Boss Blades with a pair of Avon’s Memory Foam Grips (the small size is about 1/8″ smaller diameter than a set of stock Big Twin grips) and you’re really in control.

Posted in Product Reviews | Comments Off on Motorcycle Clutch and Brake Levers for Small Riders Kuryakyn Boss Blades

Glossary of Tuning Terms

The following are basic terms used when tuning. These will help you to understand discussion about tuning in general, refer to these when posting questions or when reading posts about fuel injection.

Acceleration – The rate of change in velocity with respect to time. According to Newton’s second law of motion, acceleration is equal to the force, divided by mass (A=F/M).

Accelerator pump – Accelerator pumps are found on motorcycles equipped with carburetors. When you accelerate, the accelerator pump delivers extra fuel through the accelerator pump circuit to allow the engine to deliver more power. Power Commander has a Accelerator pump feature for Fuel injection as well as throttle sensitivity.

Advance – See Ignition Advance/Retard

AFR Air Fuel Ratio – refers to the ratio of air to fuel in the intake mixture going into the cylinder. It is always air mass:fuel mass ratio, and is typically between 11:1 and 17:1 (the volume ratio is closer to 9000:1 air:fuel.)

ATDC After Top Dead Center – used for ignition advance timing, it refers to the crankshaft position (in degrees) After Top Dead Center on the power stroke.

Boost – This refers to the artificial increase in manifold pressure above the barometric pressure based on some sort of mechanical compressor or pump. Typically this is a turbocharger.

BTDC Before Top Dead Center – used for ignition advance timing, it refers to the crankshaft position (in degrees) Before Top Dead Center on the compression stroke.

Carburetor jet – A fitting inside a carburetor that meters fuel into a metering circuit where it is mixed with air.

Closed loop – refers to those times when an EFI computer is using the feedback on the mixture provided by the oxygen sensor to effectively control the injected amounts.

Combustion – The process by which the air/fuel mixture burns within an engine to create power.

Detonation – The sharp, metallic sound produced when two pressure, or flame fronts collide in the combustion chamber. Normally, the combustion starts at the spark plug and spread smoothly from there. If the combustion starts in a second location within the combustion chamber, then each raise the pressure in the cylinder, possibly to destructive levels.

DMM digital multi meter – electronic current/resistance/potential measuring tool.

DC Duty Cycle – A number indicating the amount of time that some signal is at full power. In the context of an ECU, duty cycle is used to describe the amount of time that the injectors are on

ECU – ECM Computer – Many modern motorcycles have a central computer called an engine control unit (ECU) or module (ECM)

EGO – refer to exhaust gas oxygen. The amount of oxygen remaining in the exhaust can be a good indication of the air/fuel ratio of the intake mixture.

EGT – refers to exhaust gas temperature.

IAC Idle Air Control – Typically a stepper motor.

IAT Intake Air Temperature – The refers to the intake air temperature, or the temperature of the air entering the throttle body. Sometimes the same as IAT but may be refered to seperatly paticualrly on air cooled motorcycles. Sometimes the difference between intake and manifold temperatures is used to change values for the ECU as pertaining to warmup.

Idle circuit – This is a special kind of circuit found in a carburetor that only operates when the engine is at an idle.

Ignition Advance/Retard – The advancing or retarding (in crank degrees) of ignition spark relative to the piston location in the cylinder.

Knock – aka detonation or ping. See Detonation

kPa (kiloPascals) – the measurement of air pressure used in some ECU computations. Average pressure at sea level is 101.3 kPa. In EFI applications, it is typically used to refers to measurements of intake manifold vacuum, boost, or barometric pressure.

Lambda – the ratio between actual air/fuel ratio and stoichiometric ratio. Lambda of less than 1 is rich, and greater than 1 is lean.

MAP Manifold Absolute Pressure – Measure of the absolute pressure in the intake manifold (related to the engine vacuum), to determine the load on the engine and the consequent fueling requirements. (Somtimes people refer to a fuel map for Power Commanders and the like or a base map for ECU’s that is not what MAP is refering to.)

MAPdot – The rate at which the MAP sensor output changes (and thus the rate at which the MAP itself changes).

millisecond – 1/1000th of one second.

MAT Manifold Air Temperature – The refers to the air temperature entering in the manifold. Sometimes the same as IAT but may be refered to seperatly paticualrly on air cooled motorcycles. Sometimes the difference between intake and manifold temperatures is used to change values for the ECU as pertaining to warmup.

NB-EGO NB-O2 – narrow band exhaust gas oxygen sensor.

Open Loop – refers to those times when ECU ignores the feedback from the oxygen sensor.

Ping – aka. detonation or knock. See Detonation

Required Fuel – For some ECUs and EFI systems, the injector pulse width, in milliseconds, required to supply the fuel for a single injection event at stoichiometric combustion, 100% volumetric efficiency and standard temperature.

Retard – Ignition Advance/Retard

rpm – revolutions per minute – a measure of the rotational speed of the engine at any time.

Stoichiometric Ratio – The ratio at which all available fuel is combined with oxygen during the combustion process. This theoretically ideal ratio produces minimum emissions, however maximum power is achieved at an AFR 10-15% richer than stoichiometric, while maximum efficiency is achieved at an AFR 3-5% leaner than stoichiometric (depending on many engine variables).

Switch point – the voltage at which a narrow band sensor goes from a low voltage to a high voltage, indicating a stoichiometric mixture.

TPS Throttle Position Sensor – A voltage divider that provides information about throttle opening, from which it computes rate of throttle opening for acceleration enrichment.

TPSdot – The rate at which the TPS sensor output changes and thus the rate at which the throttle position itself changes.

Vacuum – The measurement of vacuum starts with 0 at atmospheric pressure, and measures the pressure below that as vacuum usually in inHg – inches of mercury.

Volumetric efficiency – The actual amount of air being pumped by the engine as compared to its theoretical maximum. A 100 cubic inch motor will theoretically move 100 cubic inches of air in one cycle at 100% efficiency. If the engine is actually running at 75% VE, then it will move 75 cubic inches of air on each cycle.

WB-EGO WB-O2 – Wide band Oxegen Sensor An exhaust gas oxygen sensor that signals the intake mixture air to fuel ratio based on the content of the resulting exhaust gases. These sensors require a sophisticated controller to work.

WOT – Wide open throttle (Woo Hoo).

WUE Warm Up Enrichment – The enriched mixture applied when the coolant or intake air temperature is low.

X Tau Enrichment – a form of acceleration enrichment that models the changes in the fuel film on the port walls to estimate the effect on fuel entering the cylinder.

Posted in Motorcycle News | Comments Off on Glossary of Tuning Terms

Motorcycle Gas Tank Rust Removal Technique

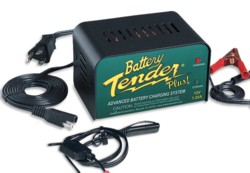
Motorcycle Fuel Tanks are often plagued by rust and liner deterioration. Take a look inside your gas tank when the fuel level is relatively low–using a flashlight, not a lighter! If there are bits of loose stuff sloshing around in the bottom of the tank, whether they’re rust or flakes of liner, they could (and will) clog up your fuel filter and/or your carburetor jets. Got Fuel Injection? That stuff will mess up the injectors.

But what’s a mother to do? New fuel tanks are expensive at best and unobtabium at worst. Not to worry, fuel tanks can be cleaned out, leaks repaired if needed, and re-lined. You can leave the job to your friendly neighborhood motorcycle shop, or you can do the job yourself. If you want to try this at home, keep in mind that the job is a major pain in the butt, takes the better part of a day–sometimes more–and will leave you with some hazardous materials to dispose of.

If you’re smarter than the average bear (and we know that you are) you’ll bring us your rusty gas tank and we’ll give it back with a nice, new commercial-quality liner that will keep rust at bay for many years to come.

Want to try it yourself anyway? Okay, but don’t say I didn’t warn you!

The best stuff for DIY types is the Kreem kit. The three-piece kit (part number KR004, MSRP $38.95) consists of a bottle of Tank Prep A, Tank Prep B, and a bottle of liner. You’ll also want a bottle of Tank degreaser (KR006, MSRP $9.50).
Here are the application instructions, taken directly from the Kreem Products web site…

Basics for good results when using Kreem Tank Liner & Tank Prep.

1. Tank Prep is a rust remover and metal etch, it does not remove grease! You must always use a Kreem Tank Cleaner/Degreaser on your tank prior to using Tank Prep. This is also important on new tanks which come with an oily protective coating.

2. Remove all rust from the tank. Tank Prep will do this properly. Time varies depending on how much rust is in the tank. Visually inspect your tank and continue until tank is free of all rust.

3. After using Tank Prep A & B do NOT dry the tank as this will cause flash rust to form. Add Kreem Tank Liner IMMEDIATELY after rinsing with Tank Prep B.

4. Do not allow Kreem Tank Liner to puddle as this will not allow the material to dry properly. Kreem Tank Liner requires air to dry and cure properly. Keep in a well-ventilated area (i.e. outdoors).

Cleaning Your Tank… 

Kreem Tank Prep is a unique two-part system to prepare metal fuel tanks before coating with Kreem Fuel Tank Liner. Used as directed, Tank Prep will remove rust and etch the metal surface to ensure maximum adhesion of Kreem Tank Liner.

It is absolutely critical that the inside of the fuel tank is oil-free, without rust and properly etched to insure adhesion of Kreem Tank Liner.

CAUTION: Read warning statements on all labels before using any of these products. Kreem Tank Prep solutions may damage paint. Tank Prep A contains acid, handle with care using protective eyewear, rubber gloves and adequate ventilation. Tank Prep B contains methyl ethyl ketone, use only in well ventilated areas, preferably outdoors. Highly flammable, do not use near open flame.

STEP 1
Drain fuel from tank into an approved container and then remove the tank from the vehicle. Remove any valves and petcocks. Seal all openings securely so that liquid will not drain out. Small openings can be capped with rubber stoppers, threaded pipe plugs, corks or wood dowels. Larger openings can be capped with a metal or wood plate and a hand-made gasket.
STEP 2
Fill the tank about one-quarter full with warm water and add Kreem Tank Cleaner/Degreaser. If the tank is badly rusted or has rust flakes, add a handful of nuts and bolts to help loosen the rust. Shake the tank until all rust has been loosened.

New Tanks: It is important to remove the oily protective coating before using tank prep. Kreem Tank Cleaner/Degreaser should be used.
STEP 3
Drain off Kreem Tank Cleaner/Degreaser solution and rinse tank with clean water to remove all soap, oil and loose rust particles.

STEP 4
Pour Kreem Tank Prep A into the tank and add 2.5 gallons of warm water; Tank Prep A works best when the tank is completely full and in contact with all metal surfaces. If this is not possible, you should turn the tank to different positions so that the solution has extended contact with all metal surfaces.

Allow tank to vent. Do not allow pressure to build up!

Leave Tank Prep A in the tank until all rust is dissolved and the metal is etched to a dull grey finish. The time required will depend on the amount of rust in the tank. New tanks can be etched in 4 hours, rusty tanks will take longer. We suggest overnight.

Heavy Rust Deposits: Tank Prep A removes rust through a chemical process which slowly neutralizes as rust is removed. In cases where the rust is so heavy that the solution becomes neutralized before the rust is entirely removed, a second treatment of Tank Prep A is required to fully remove the rust and properly etch the metal surface.

STEP 5
Pour out Tank Prep A solution and save in an appropriate container as it can be used for a second application. Rinse tank thoroughly with water. Inspect tank interior for rust removal and etching of surface. If necessary, repeat Step 4. Flush the tank with clean water until the rinse water no longer foams and all traces of Tank Prep A are removed.

STEP 6
In a well-ventilated area, immediately rinse tank interior with full-strength Tank Prep B and agitate to ensure thorough treatment. This final rinse will remove any residual water and will prime and condition the tank for Kreem Fuel Tank Liner.

STEP 7
Using a funnel, carefully drain Tank Prep B back into its original container and close tightly.

You are now ready to seal your tank with Kreem Fuel Tank Liner.

Coating Your Tank…

Kreem Fuel Tank Liner is designed for use as a preventive maintenance product in new and old metal tanks containing gasoline, gasohol or diesel fuel. Kreem Tank Liner has a unique formulation with extremely rapid set-up, that prevents leakage from hairline cracks and seam pinholes by coating the tank’s inner surface with a fuel resistant elastomer. When properly installed, Kreem Tank Liner seals the inside surfaces of metal tanks from moisture and oxygen.

For small tanks (1-5 gallons), use one pint of Kreem Tank Liner. For larger tanks, use one quart per 20 gallons of tank capacity. If the tank contains baffles, be sure to consider the increase in surface area. For spraying or brushing, thin with methyl ethyl ketone to desired consistency.

CAUTION: Read warning statements on all labels before using any of these products. Kreem Tank Liner may damage paint. Kreem Tank Liner contains methyl ethyl ketone and the vapors can be harmful. Use only in well-ventilated areas, preferably outdoors. Highly flammable, do not use near open flame.

Kreem Tank Liner is NOT for use in plastic containers.

Kreem Tank Liner is NOT compatible with all fiberglass tanks. You must spot test to determine compatibility with Kreem Tank Liner before use.

STEP 1
To obtain proper adhesion, the inside surfaces of the tank must be rust-free, oil free and the metal surface etched. We strongly suggest that you use the Kreem Tank Prep Kit to remove rust and etch the metal before using Kreem Tank Liner. Read the previous section on Cleaning Your Tank.

STEP 2
If not already done, securely seal all tank openings per instructions from previous section.

STEP 3
Shake or stir Kreem Tank Liner well before use. Keep container tightly closed when not in use.

STEP 4
Carefully pour Kreem Tank Liner into the tank taking care not to get any on painted surfaces. Close spout and gently rotate the tank in all directions to coat entire inner surface. When all surfaces have been completed coated there should still be a generous excess left in the tank. Let tank stand 8-10 minutes with spout open. Close the spout and slowly rotate the tank to re-coat surfaces again. Let tank stand on a different side for an additional 8-10 minutes with spout open. Repeat this process until the tank has the desired coating.

Important: Do not allow the coating to puddle or pool and dry.

STEP 5
Using a funnel, drain off excess coating back into the original container for later use. Remove all stops and allow to air-dry in a well-ventilated area for at least 24 hours. A nozzle from a low pressure air compressor blowing lightly into the fuel spout and out another opening will greatly reduce step time. DO NOT USE A HAIR DRYER!

For extra protection: Allow tank to air-dry for 6 hours or longer, re-seal openings and repeat Steps 4 and 5 of application process.

STEP 6
Carefully trim off any excess Kreem Tank Liner around valves and petcocks and then reassemble the tank and mount.

And there you go! If you’ve done everything perfectly, your gas tank is now clean and sealed. If you cheated on any part of the process, you’ll shortly have a mess on your hands of Titanic proportions as the new liner will detach from the sides of the tank and make your life a living hell.

Posted in Motorcycle Tech Tips | Comments Off on Motorcycle Gas Tank Rust Removal Technique

Regular Rider Maintenance For Your Motorcycle

If you value safety there are some things you should check yourself on a regular basis. Routine maintenance is important but pre-ride inspections and regular safety checks should be done between service intervals. If you don’t have an owner’s manual with specs on your motorcycle try to get one. If you can’t find your owners manual or if it is lacking specifications you may want to consider purchasing a service manual for reference. Factory manuals can be very expensive, but there are generic manuals available at most motorcycle shops and bookstores that will have the information you need for your bike.

You should always have the manufacturer’s recommended regular services performed, but the following are things the operator should do between services.

Things you should check before every ride.

Tires and Tire pressure – Make sure both the tires are in good condition. Look for uneven tread wear or damage. You should have a good tire gauge and check that the tires are inflated to specifications. (Note: Because your tires may not be the same brand as the ones that were originally on the motorcycle check the max preasure inscribed on the sidewall of the tire, NOT the numbers listed in the Owner’s Manual or the sticker on the frame.) Remember that the tire pressure should be checked and adjusted when the tires are “cold” aka ambient air temperature. Tire pressures will rise 10% or more when they reach operating temperature. Don’t trust gas station pump air gauges they are often inaccurate; use a good hand-held air gauge. And check the tire pressure regularly. Tires will loose air over time; as much as 5 psi per week.

Oil level – Check the oil as per manual with the bike on a level ground.

Brakes – Make sure the brakes are functioning properly.

Lights – All lights should be checked; high and low beam, turn signals, running lights and brake light (check both front and rear brake lever activation).

Chain or Belt – Check the tension of the belt or chain. Look for damage on belts and make sure chains are well lubricated.

Things to check periodically on your motorcycle 

Battery – Make sure battery connections are tight and free of corrosion. Also check the electrolyte level on conventional batteries.

Brakes – Look for fluid leaks and inspect brake pads or shoes for wear.

Controls – Levers and switches should operate smoothly. Check cables for signs of wear or breakage.

These suggestions are for the operator to perform between regular service intervals. Be sure to keep up with the regular scheduled maintenance as these procedures are designed to avoid catastrophic failures and prolong the dependability and ride ability of your motorcycle.

Posted in Motorcycle Tech Tips | Comments Off on Regular Rider Maintenance For Your Motorcycle

Don’t Let This Happen To You

It’s the first nice, springy day. The snow is gone, the birds are singing, and you just can’t wait to take your motorcycle out for the first ride of the season.

You open the garage, push the snow blower out of the way, and back your bike out into the sunshine. You turn the key to “on,” and push the starter button. “RR!” says your bike. “RR! Rr. rr. clickclickclickclick…click.” Silence, right now, is anything but golden. Your battery has transformed into a ten-pound rock.

The best thing you could do right now is to take the battery out of your bike and bring it over to Bikes Built Better. We’ll charge your battery up using a computer-controlled charger (Battery Tender) that will bring it up to snuff without blowing its brains out. We’ll also test it and let you know if you’re good to go, or if you might want to replace the battery for the rest of the season. What’s all that cost? Nothing!

We stock high-quality batteries for most motorcycles. AGM batteries (also known, erroneously, as gel batteries) are our favorites for their big cranking amps and long life. For some bikes AGM batteries are not available, and for them we carry top-quality conventional batteries from manufacturers like Yuasa. Most of our conventional batteries are sealed, which means you don’t have to add water.

But wait, there’s more! We also carry Battery Tenders, both the Plus and the Junior. These computerized chargers are specifically designed to be attached to a motorcycle battery, where they will bring the battery up to optimum charge and then keep it there…indefinitely. You hook it up, plug it in, and leave it. All day, all night, all winter. We’ve got batteries, kept on Battery Tenders whenever the bike’s not being ridden, that are seven years old and still going strong. Just think…if you had spent $33.95 on a Battery Tender Jr last fall you would be out riding right now, not waiting for word on whether your battery will make it for another year.

Posted in Motorcycle Tech Tips | Comments Off on Don’t Let This Happen To You

Motorcycle Winterizing Tips

The days are short and the nights are long and chances are unless you plan to do the Polar Bear Grand Tour you’re going to be storing your motorcycle for the winter. Before you put your bike away for the next few months, it is very important to take some time to do some preventive maintenance. Assuming you have been keeping up with your regular maintenance, here are a few simple tips that will ensure that your motorcycle will be ready in spring and could save you costly repairs.

You should first take your motorcycle out for one last ride. Ride long enough to ensure that the bike is at full operating temperature. This will take some time if it is a cold day. Don’t just let it sit and idle, ride it for at least 20 minutes to a half-hour. Pay attention to noises or other issues you may have been ignoring, and make note of them. Any mechanical problems you have should be addressed now, NOT in the spring! Before returning home or to your storage location, FILL THE GAS TANK. Empty fuel tanks are susceptible to condensation and the bare metal inside the tank can rust.

When you return to your garage and are ready to begin the storage procedure, top the gas tank with fuel stabilizer and run the motorcycle for a few minutes to allow it to work its way throughout the fuel system. If your bike has a manual fuel valve, shut it off and run the bike until it runs out of gas. If you have a carbureted bike and you can drain the carburetor fuel bowls, go for it. With the addition of ethanol to the gas these days I have seen a lot more problems arise from fuel evaporating inside the crabs. (They don’t taste very good, either.)

Change the oil and filter. Old oil can contain contaminants that can damage sensitive internal engine components over time. For some models (metric) you may consider over-filling the crankcase to submerge additional components inside the motor, but be sure not to forget to remove excess oil before you start the bike again in spring. You should check antifreeze level in the reservoir, and top off if necessary.

Don’t store a dirty motorcycle! Road grime, dust, oil and salt can cause damage to the bike’s finishes and that damage only gets worse if it’s left to sit for a period of time. By this time the bike should be cool, so you can wax the paint and use a substance like S100 Corrosion Protectant (incredible stuff) on the unpainted parts—but don’t spray it on the brake rotors if you ever want to stop again. You can use it on fasteners, clamps, handlebars, forks, wheels etc. Again, be careful not to get it on the tires or brake components.

Don’t forget to lube the drive chain, if you’ve got one.

If your motorcycle is to be stored outside or in a location without any heat at all you will want to remove the battery. Batteries can freeze in extreme cold. No matter where you store the bike or the battery, the use of a Battery Tender is highly recommended. Batteries are very expensive and a Battery Tender will keep the battery at an optimal charge without over charging. Just plug it in and walk away; no need to do anything else until you’re ready to ride the bike again. DO NOT USE A CAR TRICKLE CHARGER this can destroy a battery in just a few hours.

If you are storing you motorcycle inside a garage or shed you may want to consider a light weight cover one that can breathe so condensation will not build up inside. Don’t uses an outdoor cover inside, these tend to trap moisture. On the other hand if you must store your motorcycle outdoors get yourself a good quality motorcycle cover that will be secured tightly on the bike.

Be sure to check your tire air pressure. They should be inflated to or near the maximum pressure listed on the sidewall of the tires. If possible, put your bike on its stand to keep weight off the tires and suspension. Do not allow your tires to go flat over the winter as this may cause permanent damage. if you are storing the bike for a very long period of time, move it occasionally or block it up off the ground.

Well, I hope you find these tips helpful. If you follow them chances are you are going to be back riding in just a few short months and your bike will be clean and in excellent condition. But if you don’t want to do any of this it could be very costly in the spring, the average carburetor rebuild is well over $300.00 these days.

Well happy Hibernating! See You In The Spring.

Bikes Built Better Now Offers Winter Motorcycle Storage Click Here

Posted in Motorcycle Tech Tips | Comments Off on Motorcycle Winterizing Tips

Denali DR1 Chrome LED Driving Lights

dr1 1200_630
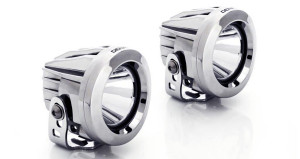
The DR1 lights are Ideal for night riding in conditions where maximum beam distance is desired. Consuming only 10 watts of power per lamp. The DENALI DR1 Lights throw a blazing beam of light 695 feet down the road. That’s over 4 times further than your typical motorcycle high beam. The large 10° optic in the DENALI DR1 maximizes the distance you can see down the road by concentrating a spot beam pattern at the center of the road…or wherever you choose to aim them. Properly mounted and aimed they provide amazing illumination without provoking oncoming traffic.
All Denali LED lights are housed in rugged waterproof aluminum housings (submersible up to 3 meters underwater). Their LEDs have an average life span of 50,000 hours, that’s 6 years without ever being shut off.
Every light kit includes a purpose built motorcycle wiring harness, universal M8 mounting brackets and detailed wiring diagrams that are simple and easy to understand. Bike specific light mounts are also available for many popular bike models. The DR1 lights are also available in black.

  • Pod Size: 3.75″ round x 3.8″ long
  • LED: (1) 10 watt CREE XM-L2 each
  • Beam Distance: 695 feet
  • Input Voltage: 12V DC
  • Power Draw: 1.5 amps per pair
  • Intensity: Single
  • Beam Angle: 10° lenses
  • Waterproof: IP-68
  • Mount: Universal M8
  • Optional Snap-On Beam Filters available
Posted in Product News | Comments Off on Denali DR1 Chrome LED Driving Lights

Avon Memory Foam Grips

Avon has revolutionized the Harley-Davidson hand grip market! The new Memory Foam grips feature a cushy, vibration-absorbing foam and are available in sizes to fit anybody’s hands. For the first time, foam grips aren’t just for the big guys! Riders with medium and small hands can also have a grip that looks good AND FEELS GOOD!
These grips are available in sizes Small (1.375″ diameter) Medium (1,5″ diameter) and Large (1.625″). Styles include Chrome or Black rounded ends, and Chrome or Black Spike ends. These grips are available for both cable and FTW Harley models.
Stop by and feel for yourself how nice these grips are….and take home a set for only $64.95!

avon memory foam grips

Posted in Product News | Comments Off on Avon Memory Foam Grips